Testbench operations
Russian version
Brief guidelines
Load serial data:
ssh phnxrc@phoncsc
cd $ARCNET_DATA/emc/tb
init_emctb.pl
Start terminals for iocondevs and runcontrol GUI:
ssh phnxrc@phoncsc
ts iocondev13
ts iocondev1e
rc -standalone
Make sure that zero suppresion is off (Options->Config Readout->Zero Suppression->Off)
Press Download
Press Open
Press Calibration
To analyse data one can use Terry's code:
ssh phnxrc@va042.phenix.bnl.gov
cd ~/awes/Testbench/
root -l
 gSystem->Load("libemcOMpg.so");
 .x fullInit.C
 .x fullBook.C(1)
 .L fullRead.C
 fullRead(full_prdf_file_name,run_number)
 .q
root -l
 .x scanAK.C(run_number))
Usually prdf files are stored in $STANDALONE_DISK/calibdata
Please put testbench results to the EmCal database
Testbench setup
For setting testbench up starting from the very beginning one should
do the following steps.
- Connect all cables and turn power on
- Load serial data through arcnet
- Load DCM and GTM
- Take a run and analyse it
- Make a record in the EmCal database
Assembling testbench
In this section the most important tip is the following.
If you do not know that to do call John Haggerty or Terry Awes.
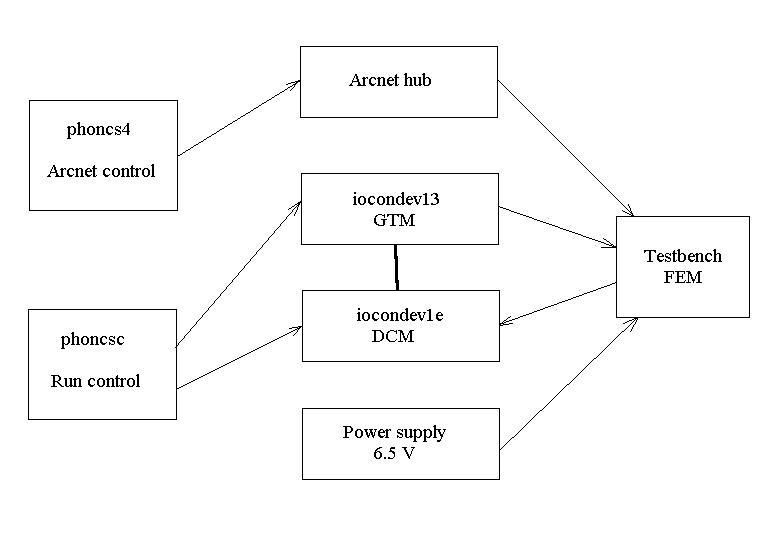
 Click on a block to see the picture of this hardware
If you know that to do but forgot it do the following steps.
- Check if GTM/DCM crate and Arcnet hub are on
- Make sure that cables are connected properly.
- Arcnet cable should connect arnet hub and arcnet card in the testbench FEM
- GTM fiber should connect GTM output somethere on the back side of GTM crate and
GTM input socket on the testbench FEM
- DCM fiber should connect DSP#3 input on the DCM and DCM output socket on the testbench FEM
- DCM busy cable should be connected to GTM busy input
- Power cable should be plugged
- Turn 6.5V power on
- The testbench FEM must be visible. From phoncs4 (Sun mashine next to the testbench FEM) issue:
/home/phoncs/arcnet/utility/netmap
Nodes 1 and 255 must be on.
Taking data
- Under phnxrc account load serial data to the FEM:
ssh phnxrc@phoncsc.phenix.bnl.gov
ts iocondev1e
cd $ARCNET_DATA/emc/tb
./init_emctb.pl
This must load $ARCNET_DATA/emc/acf/emc_tb_long_gray_1fem.acf config file
- Check if appropriate pcf file is loaded to the DCM.
In file $RC_HW_CONF/emc.tb.pcf only DSP#3 must be included to readout.
If it points to emc.tb.pcf.29102004 it should be OK.
[phnxrc@phoncsc]$ ll $RC_HW_CONF/emc.tb.pcf
lrwxrwxrwx    1 phnxrc   rhphenix       19 Jun  3 13:15 /export/software/oncs/online_configuration/rc/hw/emc.tb.pcf -> emc.tb.pcf.29102004
- Start terminal for icondev1e :
ts iocondev13
- Start run control GUI
ssh phnxrc@phoncsc.phenix.bnl.gov
rc -standalone

Choose EMC.TB
- Make sure that zero suppresion is off (Options->Config Readout->Zero Suppression->Off)
Make sure that alternate data format is chosen (Options->Config Readout->Data Format->Alternate)
Press Download
Press OK green button, then press File->Load Mode Bits. Chose GTM.emc_tb_AK_11272006.gtm. Change clock source to Internal.
Press Open
Press Start
Press Calibration
- To analyse data one can use Terry's code:
ssh phnxrc@va042.phenix.bnl.gov
cd ~/awes/Testbench/
root -l
 gSystem->Load("libemcOMpg.so");
 .x fullInit.C
 .x fullBook.C(1)
 .L fullRead.C
 fullRead(full_prdf_file_name,run_number)
 .q
root -l
 .x scanAK.C(run_number))
Usually prdf files are stored in $STANDALONE_DISK/calibdata
Please put testbench results to the EmCal database
Last update:
Andrey Kazantsev
 Click on a block to see the picture of this hardware
 Click on a block to see the picture of this hardware